
Are you tired of dealing with clogged or dirty filter cartridges that slow down your system? Knowing how to replace filter cartridges yourself can save you time, money, and hassle.
In this guide, you’ll discover simple steps to swap out old filters quickly and easily, even if you’ve never done it before. By the end, you’ll feel confident maintaining your filters, ensuring your equipment runs smoothly and efficiently. Keep reading to learn exactly what to do, and say goodbye to worries about dirty filters for good!
Credit: puregoldwaterfilters.com.au
Choosing The Right Filter Cartridge
Replacing filter cartridges helps keep your system working well. Picking the right cartridge is important for clean water and long system life.
This guide explains how to choose a filter cartridge that fits your needs and system type.
Types Of Filter Cartridges
Filter cartridges come in many types. Each type removes different particles and impurities from water.
- String-wound cartridges trap large dirt and sediment.
- Carbon block cartridges reduce chlorine and bad tastes.
- Pleated cartridges have a large surface area to catch fine particles.
- Membrane cartridges filter out bacteria and very small contaminants.
Matching Cartridge To System
Your filter system needs a cartridge that fits size and flow requirements. Using the wrong size can cause leaks or poor filtering.
| System Type | Recommended Cartridge Size | Flow Rate (GPM) |
| Under Sink | 10 inches | 0.5 – 1.5 |
| Whole House | 20 inches | 5 – 15 |
| Commercial | 30 inches | 15 – 30 |
Checking Cartridge Specifications
Look at cartridge specs before buying. Check the micron rating, material, and lifespan to match your water quality and usage.
- Micron rating shows the smallest particle the filter catches.
- Filter material affects what the cartridge can remove.
- Lifespan tells how long the cartridge works before replacement.
- Pressure limits ensure safe operation without damage.
Tools And Materials Needed
Replacing filter cartridges is a simple task if you have the right tools and materials. Being prepared helps the process go smoothly and safely.
This guide covers the essential tools, safety gear, and replacement cartridges you will need before starting.
Essential Tools
You need a few basic tools to remove old cartridges and install new ones. These tools make the job easier and prevent damage.
- Adjustable wrench for loosening filter housings
- Screwdriver to open clamps or screws
- Bucket to catch water spills
- Clean cloth to wipe parts
- Flashlight to see inside tight spaces
Safety Gear
Safety gear protects you from water leaks and sharp edges. Always use the right gear to avoid injuries.
| Safety Item | Purpose |
| Gloves | Protect hands from dirt and cuts |
| Safety glasses | Shield eyes from splashes |
| Protective clothing | Keep clothes clean and dry |
| Non-slip shoes | Prevent slipping on wet floors |
Replacement Cartridges
Choose the right replacement cartridges for your filter system. Using the correct type ensures good water quality and system performance.
- Check the cartridge size and model number
- Match the cartridge type to your filter system
- Buy cartridges made from quality materials
- Keep spare cartridges on hand for future changes
Preparing For Cartridge Replacement
Replacing filter cartridges keeps your system clean and working well. Preparing correctly makes the process safe and easy.
Before you start, you need to follow some important steps. These steps protect you and help you finish the job faster.
Shutting Off The System
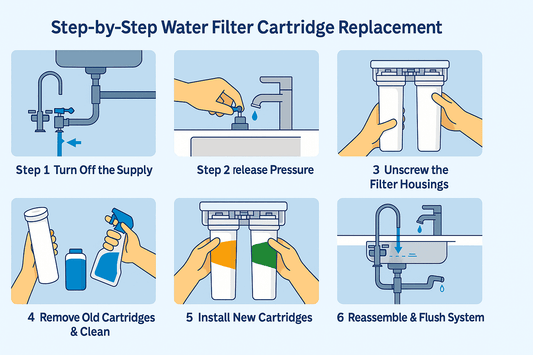
Turn off the system to stop water flow. This prevents leaks and spills while you work.
Locate the main valve or switch and close it fully. Double-check to be sure the system is off.
Relieving Pressure
Release pressure in the system before opening it. Pressure can cause water to spray out suddenly.
Find the pressure release button or valve. Press or open it slowly until no more water comes out.
- Wear safety goggles to protect your eyes
- Have a towel or small bucket ready to catch water
- Release pressure carefully to avoid spills
Gathering Equipment
Get all tools and materials before replacing the cartridge. This saves time and prevents mistakes.
- New filter cartridge that fits your system
- Wrench or tool to open the filter housing
- Bucket or container to catch water
- Clean cloth or towel for spills
- Gloves to keep hands clean and safe
Removing The Old Cartridge
Removing the old filter cartridge is an important step to keep your system working well. Follow these simple parts to do it safely and cleanly.
Careful handling helps avoid damage and prepares the housing for the new cartridge.
Opening The Filter Housing
First, turn off the water supply to the filter. Then, release any pressure by opening a nearby faucet. Use the correct tool to unscrew the filter housing. Be careful not to damage the threads or seals.
Extracting The Used Cartridge
Remove the old cartridge slowly to avoid spills. It may be wet or dirty. Use gloves if needed. Pull it straight out to avoid damaging the housing.
- Grip the cartridge firmly near the top.
- Pull it straight upwards with steady force.
- Set it aside for disposal or cleaning.
- Check for any stuck debris inside the housing.
Inspecting The Housing
Look inside the filter housing for cracks or dirt. The seal ring should be clean and intact. Replace the seal if damaged. Clean any residue with a soft cloth.
| Check Point | What to Look For | Action Needed |
| Housing Walls | No cracks or deep scratches | Replace housing if damaged |
| Seal Ring | Clean, no cracks or tears | Replace if worn out |
| Residue | No dirt or buildup | Wipe clean before new cartridge |
Installing The New Cartridge
Replacing your filter cartridge is essential for clean water. Follow these steps to ensure it is installed correctly.
Proper installation prevents leaks and maintains water quality. Let’s dive into the process.
Positioning The Cartridge Correctly
Make sure to align the cartridge with the housing properly. This ensures the water flows smoothly through the filter.
Sealing The Housing
After positioning, sealing the housing is crucial. This step prevents water from escaping and leaking out.
- Ensure the O-ring is in place and not damaged.
- Hand-tighten the housing securely.
- Use a wrench if needed for a snug fit, but do not over-tighten.
Ensuring Proper Fit
Check that the cartridge fits well. A proper fit ensures no unfiltered water bypasses the cartridge.
| Check | Action |
| Cartridge alignment | Re-adjust if necessary |
| O-ring condition | Replace if worn out |
| Housing seal | Tighten further if loose |

Credit: aquapoolsupply.com
Testing The System After Replacement
After you replace the filter cartridges, it is important to test the system. Testing makes sure the system works well and is safe to use.
Check the system carefully to avoid leaks or problems. Follow these steps to test your system correctly.
Turning The System Back On
Turn the system on slowly after replacing the cartridges. This helps avoid pressure spikes that can damage parts.
Make sure all valves are open and the power is connected. Watch for any unusual sounds or signs of trouble.
Checking For Leaks
Look closely at all connections and joints for leaks. Water or air leaks can reduce system performance and cause damage.
- Use a dry cloth to feel around seals and fittings.
- Check for moisture or dripping water under the system.
- Tighten any loose connections if needed.
Monitoring Performance
Watch how the system runs for the first few hours after replacement. Check water flow and pressure to ensure normal operation.
Record any changes or drops in performance. This helps catch issues early before they cause bigger problems.
Maintenance Tips For Longevity
Replacing filter cartridges is important to keep your system clean. Proper care helps your filters last longer.
Follow simple maintenance tips to avoid damage and ensure good water quality.
Regular Replacement Schedule
Change filter cartridges on time to keep the system working well. Old filters can clog and reduce flow.
Check the manufacturer’s guide for how often to replace cartridges. Usually, every 3 to 6 months is best.
- Set reminders for replacement dates
- Use fresh cartridges to avoid contamination
- Replace immediately if water flow drops
Cleaning The Housing
Clean the filter housing each time you change cartridges. Dirt and debris can build up inside.
Use warm water and mild soap to wash the housing. Rinse well to remove all soap before adding new cartridges.
- Remove the housing carefully
- Wipe all surfaces with a soft cloth
- Check seals and O-rings for damage
- Replace seals if they look worn
Storing Spare Cartridges
Store spare cartridges in a cool, dry place away from sunlight. Heat and moisture can damage filters.
Keep cartridges in their original packaging until use. This helps keep them clean and ready.
- Avoid storing near chemicals or strong smells
- Check expiration dates on cartridges
- Rotate stock so older cartridges are used first

Credit: www.youtube.com
Frequently Asked Questions
How Often Should Filter Cartridges Be Replaced?
Filter cartridges should be replaced every 3 to 6 months. Frequent use or poor water quality may require earlier replacement. Regular changes ensure optimal filtration and maintain water taste and safety.
What Tools Are Needed To Replace Filter Cartridges?
You typically need a filter wrench, a bucket, and gloves. Some filters may require specific tools included in the kit. Always check your filter’s manual before starting the replacement.
How Do I Know When To Replace Filter Cartridges?
Signs include reduced water flow, bad taste, or odor. Cloudy or discolored water also indicates the need for replacement. Regular checks prevent filter clogging and ensure clean water.
Can I Reuse Filter Cartridges After Cleaning?
Most cartridges are not designed for reuse after cleaning. Cleaning may damage the filter media and reduce effectiveness. It’s best to replace cartridges as recommended for safety and performance.
Conclusion
Replacing filter cartridges keeps your system clean and working well. Regular changes help stop clogs and improve water flow. Follow the steps carefully to avoid damage and save time. Use the right tools and new cartridges for best results. Check filters often to know when to replace them.
Clean filters mean better water quality and longer system life. Keep your setup healthy with simple, quick cartridge swaps. Easy to do, good for your home and health.